Stuck on this Problem?
Email Signature Maker
Tutorial
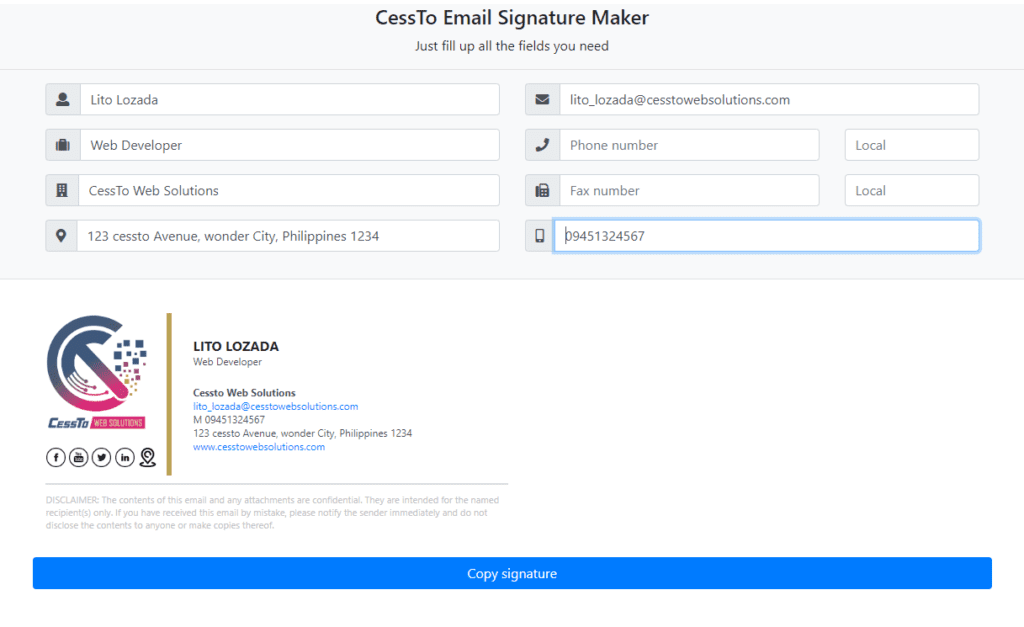
I’ll be sharing with you this simple “Email Signature Maker“ project I’ve done for my client before. After this tutorial, you will be able to recreate this base from what you need and want. Suppose you are going to use this for your company emails. In that case, all of the images you’re going to use must be uploaded to your company’s hosting server and it should be running in a secure sockets layer or have an SSL certificate. If not, your emails will be sent directly to the receiver’s spam folder.
Below is the screenshot of what it’s going to look like,

Before we begin I am expecting you have a piece of knowledge of HTML. Ok so first let’s begin with the standard HTML format.
					<html>
    <head>
        <meta http-equiv="Content-Type" content="text/html; charset=UTF-8">
        <title>Cessto Signature Generator</title>
    </head>
    <body>

    </body>
</html>
For the form, we’ll be using bootstrap and FontAwesome for the icons.
Put these lines inside the HEAD section.
					<script src="https://maxcdn.bootstrapcdn.com/bootstrap/4.0.0/js/bootstrap.min.js"></script>
<link href="https://maxcdn.bootstrapcdn.com/bootstrap/4.0.0/css/bootstrap.min.css" rel="stylesheet" id="bootstrap-css">
This is for fontawesome. Put this inside the HEAD section as well.
<link rel="stylesheet" href="https://use.fontawesome.com/releases/v5.0.8/css/all.css">
DESIGNING THE FORM
Normally I go to bootstrap documentation, for reference. So, if you want another approach to designing your form, be sure to check it out.
Put these lines inside the body.
					<div class="bg-light">
    <article>
        <h4 class="mt-3 text-center">CessTo Email Signature Maker</h4>
        <p class="text-center">Just fill up all the fields</p>
        <hr>
        <form>
            <div class="container">
                <div class="row">
                    <div class="col-md-6">
                        Column 1
                    </div>
                    <div class="col-md-6">
                        column 2
                    </div>
                </div>
            </div>
        </form>
    </article>
</div>
For the first column,
					<div class="form-group input-group">
    <div class="input-group-prepend">
        <span class="input-group-text"> <i class="fa fa-user"></i> </span>
    </div>
    <input name="fname" id="fname" class="form-control" placeholder="Full name" type="text">
</div>

<div class="form-group input-group">
    <div class="input-group-prepend">
        <span class="input-group-text"> <i class="fas fa-suitcase"></i> </span>
    </div>
    <input name="position" id="position" class="form-control" placeholder="Position" type="text">
</div>

<div class="form-group input-group">
    <div class="input-group-prepend">
        <span class="input-group-text"> <i class="fa fa-building"></i> </span>
    </div>
    <input name="cname" id="cname" class="form-control" placeholder="Company name" value="CessTo Web Solutions" type="text">
</div>

<div class="form-group input-group">
    <div class="input-group-prepend"> <span class="input-group-text"> <i class="fas fa-map-marker-alt"></i> </span>
    </div>
    <input name="address" id="address" class="form-control" placeholder="Address" type="text" value="123 cessto Avenue, wonder City, Philippines 1234">
</div>
For the second column,
					<div class="form-group input-group">
    <div class="input-group-prepend"> <span class="input-group-text"> <i class="fa fa-envelope"></i> </span>
    </div>
    <input name="email" id="email" class="form-control" placeholder="Email address" type="email">
</div>

<div class="row">
    <div class="col-md-8">
        <div class="form-group input-group">
            <div class="input-group-prepend"> <span class="input-group-text"> <i class="fa fa-phone"></i> </span>
            </div>
            <input name="pnumber" id="pnumber" class="form-control" placeholder="Phone number" type="text">
        </div>
    </div>
    <div class="col-md-4">
        <input name="plocalnumber" id="plocalnumber" class="form-control" placeholder="Local" type="text">
    </div>
</div>

<div class="row">
    <div class="col-md-8">
        <div class="form-group input-group">
            <div class="input-group-prepend"> <span class="input-group-text"> <i class="fas fa-fax"></i> </span>
            </div>
            <input name="fnumber" id="fnumber" class="form-control" placeholder="Fax number" type="text">
        </div>
    </div>
    <div class="col-md-4">
        <input name="fnumber" id="flocalnumber" class="form-control" placeholder="Local" type="text">
    </div>
</div>
<div class="form-group input-group">
    <div class="input-group-prepend"> <span class="input-group-text"> <i class="fas fa-mobile-alt"></i> </span>
    </div>
    <input name="mnumber" id="mnumber" class="form-control" placeholder="Cellphone / Mobile Number" type="text">
</div>
At this point, you should now have this,

DESIGNING THE SIGNATURE
Now next is to do the format of the signature. Here is what I want to achieve.

And here’s the HTML code.
<div class="container">
<div class="row">
<div class="col-md-6">
<div id="selectThisText">
<table width="550" border="0">
<tbody>
<tr>
<td style="padding-right:0px; padding-bottom:10px; width:130px;" width="130">
<img decoding="async" src="be-newlogo.png" width="120" alt="be newlogo" title="Email Signature Maker 4">
<br>
<br>
<a href="https://www.facebook.com/cesstowebsolutions" target="_blank" rel="noopener"><img decoding="async" src="facebook.png" style="width:23px;" alt="facebook" title="Email Signature Maker 5"></a>
<a href="https://www.youtube.com/user/cesstoweb" target="_blank" rel="noopener"><img decoding="async" src="youtube.png" style="width:23px;" alt="youtube" title="Email Signature Maker 6"></a>
<a href="https://twitter.com/cesstoweb" target="_blank" rel="noopener"><img decoding="async" src="twitter.png" style="width:23px;" alt="twitter" title="Email Signature Maker 7"></a>
<a href="https://www.linkedin.com/in/cesstowebsolutions/" target="_blank" rel="noopener"><img decoding="async" src="linkedin.png" style="width:23px;" alt="linkedin" title="Email Signature Maker 8"></a>
<a href="https://www.google.com.ph/maps/place/Rizal+Park+-+North/@14.5844868,120.9796101,17z/data=!3m1!4b1!4m5!3m4!1s0x3397ca214a3d8bef:0x264724196efed847!8m2!3d14.5844868!4d120.9818041" target="_blank" rel="noopener"><img decoding="async" src="https://drive.google.com/uc?export=view&id=16qVuzLL8OkAz0bHJxsGWSMstgnpxXDPB" style="width:23px;" alt="" title="Email Signature Maker 9"></a>
</td>
<td style="border-left: #BAA355 solid 6px; padding-left:20px !important; padding-bottom:10px;" width="10">
</td>
<td width="330">
<p style="margin:0px; padding:0px; text-transform:uppercase; font-size:16px; font-weight:bold;" id="fnameTxt"><br></p>
<p style="margin:0px; padding:0px; color:#495057; font-size:12px;" id="positionTxt"><br></p>
<p style="margin:0px; padding:0px;"> <br></p>
<p style="margin:0px; padding:0px; color:#495057; font-size:12px; font-weight:bold;" id="cnameTxt" margin="0" padding="0">Cessto Web Solutions<br></p>
<p style="margin:0px; padding:0px; color:#495057; font-size:12px; color:#007bff;" id="emailTxt"><br></p>
<p style="margin:0px; padding:0px; color:#495057; font-size:12px;" id="pnumberHolder"><span id="pnumberTxt"></span> <span style="margin:0px; padding:0px; color:#495057; font-size:12px;" id="plocalnumberTxt"></span></p>
<p style="margin:0px; padding:0px; color:#495057; font-size:12px;" id="fnumberHolder"><span id="fnumberTxt" class="fnumberTxt"></span> <span style="margin:0px; padding:0px; color:#495057; font-size:12px;" id="flocalnumberTxt"></span></p>
<p style="margin:0px; padding:0px; color:#495057; font-size:12px;" id="mnumberHolder"><span style="margin:0px; padding:0px; color:#495057; font-size:12px;" id="mnumberTxt" class="mnumberTxt"><br></span></p>
<p style="margin:0px; padding:0px; color:#495057; font-size:12px;" id="addressTxt">123 cessto Avenue, wonder City, Philippines 1234<br></p>
<p style="margin:0px; padding:0px;"><a href="https://cesstowebsolutions.com/" target="_blank" style="font-size:12px; color:#007bff;">www.cesstowebsolutions.com</a><br></p>
</td>
</tr>
</tbody>
</table>
<table width="550" border="0">
<tbody>
<tr style="margin:10px 0; padding:10px 0;">
<td colspan="3" height="10"> </td>
</tr><tr style="margin:10px 0; padding:10px 0;">
<td colspan="3" style="border-top:#d9dadb solid 2px; padding-top:10px; color:#bfc2c5; font-size:11px;">
DISCLAIMER: The contents of this email and any attachments are confidential. They are intended for the named recipient(s) only. If you have received this email by mistake, please notify the sender immediately and do not disclose the contents to anyone or make copies thereof.
</td>
</tr>
</tbody>
</table>
</div>
</div>
<button id="copyText" class="btn btn-primary btn-block copy-btn">Copy signature</button>
</div>
</div>
Don’t forget to change the information on the social media icons and the google map.
Alright, the idea is to get the data from the input fields and display it on the signature we just created. There are so many ways to accomplish it but what I want is to get those data in real-time as you can see on the demo page.
That can be possible using jQuery. To learn more about it, visit w3schools.
First, add this inside your header
<script src="https://ajax.googleapis.com/ajax/libs/jquery/3.6.0/jquery.min.js"></script>
And add this at the bottom of the HTML code just before the </body>.
					<script type="text/javascript">
    $(function() {
        $('#fname').keyup(function() {
            $('#fnameTxt').text($(this).val());
        });

        $('#position').keyup(function() {
            $('#positionTxt').text($(this).val());
        });

        $('#cname').keyup(function() {
            $('#cnameTxt').text($(this).val());
        });

        $('#email').keyup(function() {
            $('#emailTxt').text($(this).val());
        });

        $('#pnumber').keyup(function() {
            $('#pnumberTxt').text('P ' + $(this).val());
            if($('#pnumber').val().length == 0) {
                $('#pnumberTxt').hide();
                $('#plocalnumberTxt').hide();
            } else {
                $('#pnumberTxt').show();
                $('#plocalnumberTxt').show();
            }
        });

        $('#plocalnumber').keyup(function() {
            $('#plocalnumberTxt').text('Local ' + $(this).val());
            if($('#plocalnumber').val().length == 0) {
                $('#plocalnumberTxt').hide();
            } else {
                $('#plocalnumber').show();
            }
        });

        $('#fnumber').keyup(function() {
            $('#fnumberTxt').text('F ' + $(this).val());
            if($('#fnumber').val().length == 0) {
                $('#fnumberTxt').hide();
                $('#flocalnumberTxt').hide();
            } else {
                $('#fnumberTxt').show();
                $('#flocalnumberTxt').show();
            }
        });

        $('#flocalnumber').keyup(function() {
            $('#flocalnumberTxt').text('Local ' + $(this).val());
            if($('#flocalnumber').val().length == 0) {
                $('#flocalnumberTxt').hide();
            } else {
                $('#flocalnumberTxt').show();
            }
        });

        $('#mnumber').keyup(function() {
            $('#mnumberTxt').text('M ' + $(this).val());
            if($('#mnumber').val().length == 0) {
                $('#mnumberTxt').hide();
            } else {
                $('#mnumberTxt').show();
            }
        });

        $('#address').keyup(function() {
            $('#addressTxt').text($(this).val());
        });
    });
</script>
In this project, we are going to use the keyup event. The keyup() is an inbuilt method in jQuery which occurs when a keyboard key is released. The keyup() method triggers the keyup event or attaches a function to run when a keyup event occurs.
Look at this line;
					$('#fname').keyup(function() {
    $('#fnameTxt').text($(this).val());
});
and
<p style="margin:0px; padding:0px; text-transform:uppercase; font-size:16px; font-weight:bold;" id="fnameTxt"><br></p>
So basically, what it does is it will grab the characters you typed in the input field that has the id ”fname” and put it the <p> tag that has the id “fnameTxt” in real-time.
Now what’s left is the button once clicked should copy the entire signature.
Put this script at the bottom of your HTML code just before the closing </body> tag.
					<script type="text/javascript">
    function SelectText(element) {

        var doc = document
            , text = doc.getElementById(element)
            , range, selection
        ;
        if (doc.body.createTextRange) {
            range = document.body.createTextRange();
            range.moveToElementText(text);
            range.select();
            document.execCommand("copy");
        } else if (window.getSelection) {
            selection = window.getSelection();
            range = document.createRange();
            range.selectNodeContents(text);
            selection.removeAllRanges();
            selection.addRange(range);
            document.execCommand("copy");
        }
    }

    $(function() {
        $('#copyText').click(function() {
            SelectText('selectThisText');
        });
    $('#selectThisText').click(function() {
            SelectText('selectThisText');
        });
    });
</script>
That will do the trick. Now all you need to do is upload everything on your server and update the path of every image you used.
					<img decoding="async" src="https://yoursite.com/folder-name/facebook.png" style="width:23px;" alt="facebook" title="Email Signature Maker 10">
<img decoding="async" src="https://yoursite.com/folder-name/youtube.png" style="width:23px;" alt="youtube" title="Email Signature Maker 11">
<img decoding="async" src="https://yoursite.com/folder-name/twitter.png" style="width:23px;" alt="twitter" title="Email Signature Maker 12">
<img decoding="async" src="https://yoursite.com/folder-name/linkedin.png" style="width:23px;" alt="linkedin" title="Email Signature Maker 13">
<img decoding="async" src="pin.png" style="width:23px;" alt="pin" title="Email Signature Maker 14"></a>
If you like this tutorial, please leave a rating by clicking the stars below or send me a message if you have a question regarding this tutorial. I will appreciate it if you also share this on your Facebook, Twitter, or LinkedIn. Someone in your circle might also be needing this.
Share on facebook
Facebook
Share on twitter
Twitter
Share on linkedin
LinkedIn
Rate this:
5/5 - (1 vote)
- October 31, 2022
- email, maker, signature


