Stuck on this Problem?
Use Google Drive for your email signature maker in just 5 steps
Tutorial
Last time I shared with you my email signature maker which I made for my client in previous years. If you haven’t seen it yet, please click here.
That time I assumed that you have your hosting server to upload the assets; when I say assets, it means the images and icons displayed in the signature. Because you need to upload those images and icons somewhere, if not it would look like this.

So, the problem is, what if you don’t have any paid hosting server? Where will you upload those files? I realize that a couple of days after I posted that blog and the first idea that came to me is to use Google Drive. It is my first option because it is safe from viruses. if your storage is not safe, your email will send directly to your recipient’s spam folder. Why? simply because your email is carrying files or images that came from untrusted sources. Google Drive is fairly secure. The service has an antivirus system, which scans every single uploaded file for malicious content.
In this blog, I’ll show you how to use Google Drive as storage for your assets.
The first step is to upload the folder with the images and icons on your google drive. You don’t need to include the HTML file in that folder.
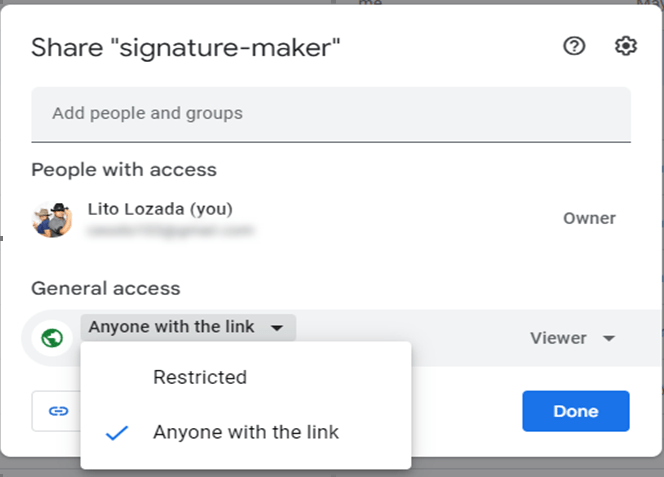
The second step is to share the folder and click the “Anyone with the link”

Once done, go inside the folder, then right-click on the image/icon, click “get link” and click the done button.

For the fourth step, in my example, I got this link, https://drive.google.com/file/d/1lReQEhkYygDHk1-rv7BJCOmg5cLqAUgc/view?usp=sharing the only thing you need is the file id so just grab this part, 1lReQEhkYygDHk1-rv7BJCOmg5cLqAUgc now add the Id in this path.
https://drive.google.com/uc?export=view&id=
You should now have something like this,
https://drive.google.com/uc?export=view&id=1lReQEhkYygDHk1-rv7BJCOmg5cLqAUgc
Now that we already have the link of the image/icon, it is time to update the path of the images in your HTML file.
For our fifth and last step, go to your HTML file and update the SRC <img src=”https://drive.google.com/uc?export=view&id=1lReQEhkYygDHk1-rv7BJCOmg5cLqAUgc”> of its corresponding image or icon.
<td style="padding-right:0px; padding-bottom:10px; width:130px;" width="130">
<img decoding="async" src="https://drive.google.com/uc?export=view&id=1y01I9xbZZIcPS9ujroBA272B0bTPGZHI" alt="" title="Use Google Drive for your email signature maker in just 5 steps 5">
<br>
<br>
<a href="https://www.facebook.com/cesstowebsolutions" target="_blank" rel="noopener"><img decoding="async" src="https://drive.google.com/uc?export=view&id=1l-4-eksoloYew-a0lPjr2j9zmdm2D2dO" style="width:23px;" alt="uc?export=view&id=1l 4 eksoloYew a0lPjr2j9zmdm2D2dO" title="Use Google Drive for your email signature maker in just 5 steps 6"></a>
<a href="https://www.youtube.com/user/cesstoweb" target="_blank" rel="noopener"><img decoding="async" src="https://drive.google.com/uc?export=view&id=1lReQEhkYygDHk1-rv7BJCOmg5cLqAUgc" style="width:23px;" alt="uc?export=view&id=1lReQEhkYygDHk1 rv7BJCOmg5cLqAUgc" title="Use Google Drive for your email signature maker in just 5 steps 7"></a>
<a href="https://twitter.com/cesstoweb" target="_blank" rel="noopener"><img decoding="async" src="https://drive.google.com/uc?export=view&id=1y0yaYc1E2l4yyG35IHoc0dPAakZr1Nue" style="width:23px;" alt="" title="Use Google Drive for your email signature maker in just 5 steps 8"></a>
<a href="https://www.linkedin.com/in/cesstowebsolutions/" target="_blank" rel="noopener"><img decoding="async" src="https://drive.google.com/uc?export=view&id=1lMPU9PWoxQzu-2Rs-JNF7voqYer-lLr6" style="width:23px;" alt="uc?export=view&id=1lMPU9PWoxQzu 2Rs JNF7voqYer lLr6" title="Use Google Drive for your email signature maker in just 5 steps 9"></a>
<a href="https://www.google.com.ph/maps/place/Rizal+Park+-+North/@14.5844868,120.9796101,17z/data=!3m1!4b1!4m5!3m4!1s0x3397ca214a3d8bef:0x264724196efed847!8m2!3d14.5844868!4d120.9818041" target="_blank" rel="noopener"><img decoding="async" src="https://drive.google.com/uc?export=view&id=16qVuzLL8OkAz0bHJxsGWSMstgnpxXDPB" style="width:23px;" alt="" title="Use Google Drive for your email signature maker in just 5 steps 10"></a>
</td>
Now save the HTML file and place it on your desktop, my document, or anywhere you want.
If this is helpful to you, please leave a star rating located below this article. You might want to also share this who knows maybe one of your social media friends is also looking for this.
In case you want to use another online storage platform like oneDrive etc and you having a hard time replicating these steps, please let me know and I will create a tutorial for you. Just contact me or chat directly on my messenger located at the lower right corner of this page.
Related Article:
Share on facebook
Facebook
Share on twitter
Twitter
Share on linkedin
LinkedIn
Rate this:
5/5 - (1 vote)
- November 18, 2022
- email, Gdrive, Google Drive, maker, signature


